
Welcome
This purpose of this guide is to provide sufficient information to allow an AdvanceGuard radar to be physically installed, powered up and configured to correctly communicate over a network. This guide assumes that a suitably trained person has already performed a site survey and a suitable mounting location identified. The HDR radar, together with the Navtech Radar software Witness, form the Navtech Radar AdvanceGuard detection system. Service and Maintenance procedures are covered in a separate manual.
| Warning |
|---|
Before performing any maintenance task ensure you are aware of Health & Safety procedures Details here: |
| Panel | |||||||
|---|---|---|---|---|---|---|---|
| |||||||
On this page:
Guide Sections:
|
Support
Navtech Radar Ltd offer comprehensive support services both pre and post radar commissioning to ensure you get the best performance and support for your radar installation.
Navtech Radar Ltd have a dedicated Customer Services Support Centre that can offer 1st and 2nd line technical support for both hardware and software queries. The centre is staffed by a highly skilled technical team who can advise and offer support with any technical questions both pre and post commissioning. In the event a fault cannot be diagnosed remotely or a repair is required, the team can arrange for your radar to be returned to base for further diagnostic tests or repair.
Navtech Radar Ltd also offer a number of support plan options during the lifetime of your radar, offering peace of mind for your installation.
For further information on the support plan options or any technical questions please contact the Navtech Customer Services Support Centre on +44 (0) 1235 832419, or email at support@navtechradar.com
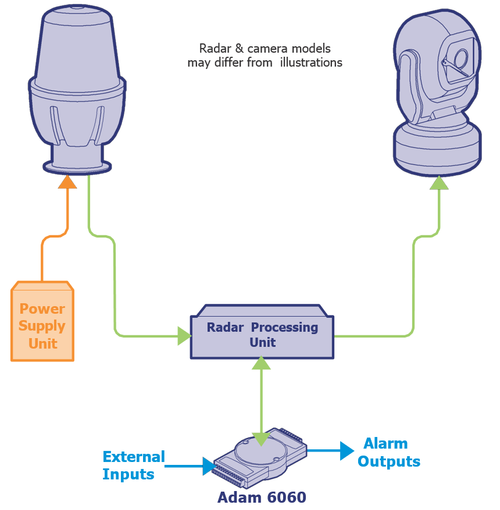
The Navtech Radar AdvanceGuard system provides high integrity detection, tracking and intelligent alarm generation for wide area intrusion detection systems.
This guide concentrates on installing the key hardware components: Radar sensors; cameras and external inputs/ outputs.
As part of the installation process this guide also covers how to test the radar sensor output and adjust its positioning for optimum performance.
For details about the Witness application group, please refer to the companion Witness Commissioning Guide.
Essential items
The following are the essential additional items that you will need to install a radar sensor:
- Laptop computer with Ethernet port, Web browser (i.e. IE v10 or higher, Chrome) and RadarView Lite software v1.59.3 or higher, with the correct configuration file (see Appendix D)
- Cat5E patch lead
- Digital inclinometer (accurate to 0.1o)
- 25m² radar targets and mounting tripods - Qty 2 of each
- Spanners to suit mounting bracket used
- 4 & 6mm Allen keys for HDR100 Series
- Pair of 2 way radios
- An assistant
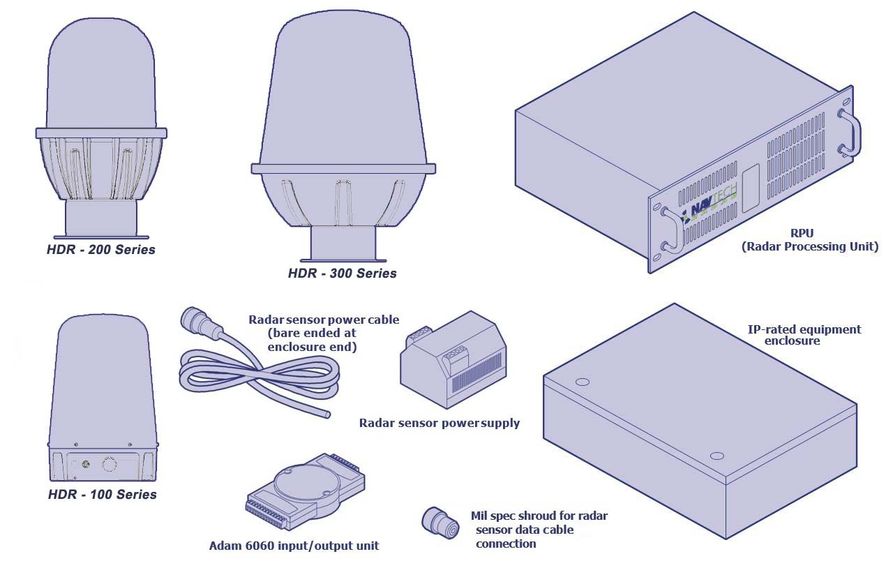
Parts
The images below show the main parts that are commonly used in most radar installations (mount poles are not shown).
Note that these images are for illustrative purposes only, as items/casing shapes are subject to change.
Sensor Specifications
HDR 100 Series Technical Specifications
HDR 200 Series Technical Specifications
HDR 300 Series Technical Specifications
Next: Mounting a radar sensor
Related information
| Info | ||
|---|---|---|
| ||
| Patent No.: GB 2 518 344 US Patent Application No.: US14/901 862 International Application No.: PCT/GB2014/052018 |